While it’s possible to use an SVG asset inside the Xcode project (since Xcode 12), we can only use it as a UIImage. So what about converting a SVG to a SwiftUI Shape?
Preface
Directly drawing forms (versus using static assets) is becoming a common practice since SwiftUI is making our life much easier. Before that, we had to use the drawRect method. And while the performances and possibilities are endless, the coding is quite grumpy, making it our last resort with UIKit projects.
As stated above, you can import a SVG file inside your Xcode project and use Image(named: "my-file.svg") inside your SwiftUI project. But you may want to use the capabilities of a SwiftUI Shape too (animate points, fill it, etc.).
There is only one way, and it’s to manually convert your SVG to SwiftUI code. However, do not fear, a tool exists since ancient times to help us in the process.
Step 1: get your SVG and PaintCode
Let’s start by downloading PaintCode. Unfortunately the licence price sucks (currently at 200$ / user / year), I think there was a one-time purchase at some point.
PaintCode allows you to convert any custom drawing (or SVG) into static assets, AND code. While it’s currently Swift code, it’s not very difficult to convert it into SwiftUI code once most of the difficult work has been done by the software. As you can see below, the export options aren’t limited to iOS projects.
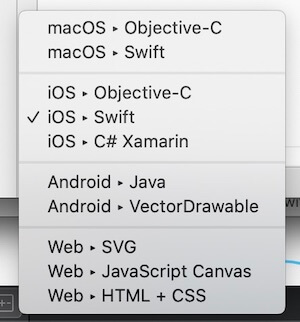
Export options in PaintCode
And obviously, get your hand on the SVG you’re interested in.
In this article, we’ll use a cloud asset.
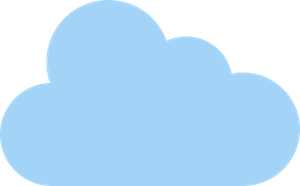
The cloud we want to convert
Step 2: adjust the SVG within PaintCode
The “tricky” part happens here: to make it usable as a “path”, we need to have relative values (e.g. positions and sizes) for the exported code.
Let’s remind us how the Shape protocol works with SwiftUI. We have to implement the method func path(in rect: CGRect) -> Path, and so create a form within the rect parameter. Meaning that we should create lines and curves based on a dynamic value, and not based on a static frame (e.g. 100x200px square).
1
2
3
4
5
6
7
8
9
|
public protocol Shape : Animatable, View {

    /// Describes this shape as a path within a rectangular frame of reference.
    ///
    /// - Parameter rect: The frame of reference for describing this shape.
    ///
    /// - Returns: A path that describes this shape.
    func path(in rect: CGRect) -> Path
}
|
Said differently, we shouldn’t export code such as path.move(to: CGPoint(x: 10, y: 20)), but we should have instead something like path.move(to: CGPoint(x: rect.minX + rect.width * 0.1, y: rect.minY + rect.height * 0.2)). Yes yes, there might be a way (at least with UIKit) by calculating the difference between “from” frame and “real” frame and applying a scaling effect, but yes honestly… no.
a. Import the SVG file and clip it around the canvas.
Make sure the shape (here the blue cloud) fits inside the canvas (the white zone). You likely will have to resize the canvas, either with the mouse (click and resize from its bottom-right corner), or from the menu (inside the right column).
Use this occasion to properly name the canvas (here “cloud”) and the form (here “mainShape”). This may have an impact on exported code and asset.
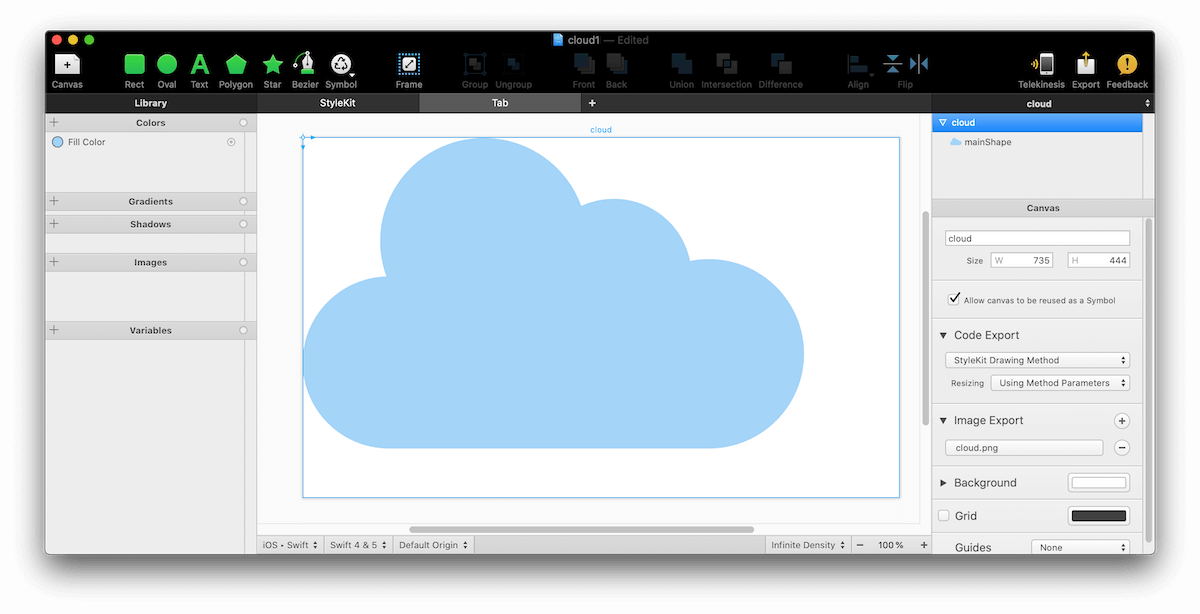
Cloud before adjusting the canvas size
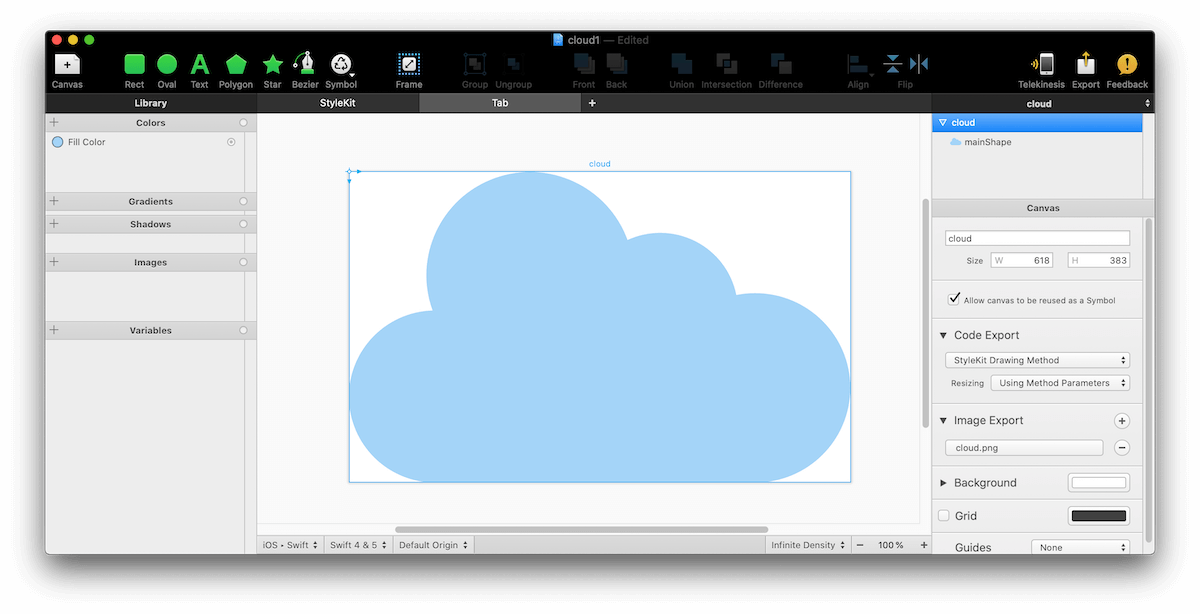
Cloud after adjusting the canvas size
If you export the code right now, you’ll get some hard-coded frame, which isn’t our desired goal. PaintCode includes for UIKit a ResizingBehavior logic to get around this problem. But honestly I highly recommend avoiding this kind of trick for SwiftUI. So let’s go on!
b. Add a “frame” around the shape.
Adding a frame around the shape will allow us to specify how it should behave in a dynamic way (like ping edge to edge).
- Click the “frame” symbol in the navigation bar.
- Add a frame with the same position and size as the canvas.
You should get something similar to this in the right column.
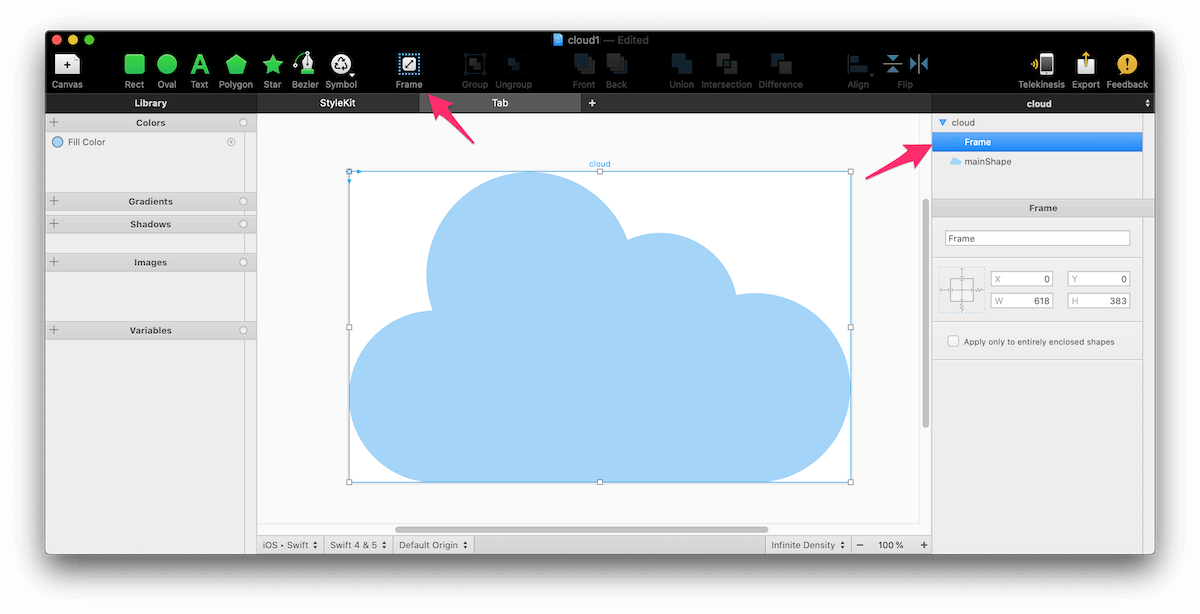
The frame has been added
c. Adjust the “pin” conditions.
Since you have added the frame, you can now edit the “pin” conditions in the menu. Make sure to have them as in the image below, so the shape will keep its edges pinned to the parent view (the canvas).
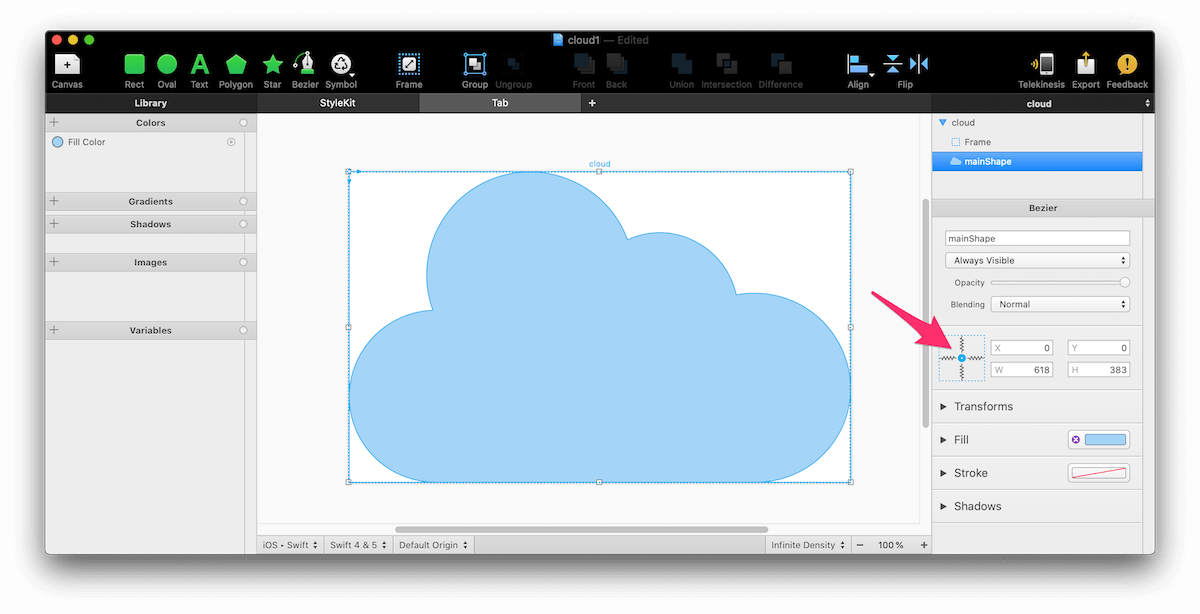
Adjust the constraints
Step 3: export the code and convert it to SwiftUI shape
If everything went smoothly, you’re ready to export the cloud to some UIKit code. We’re not done yet as we still need to convert it to some SwiftUI code as PaintCode hasn’t an export option for this (yet).
 1
 2
 3
 4
 5
 6
 7
 8
 9
10
11
12
13
14
15
16
17
18
19
20
21
22
23
24
25
26
27
28
29
|
import UIKit

public class StyleKitName : NSObject {

    //// Drawing Methods

    @objc dynamic public class func drawCloud(frame: CGRect = CGRect(x: 0, y: 0, width: 618, height: 383)) {
        //// Color Declarations
        let fillColor = UIColor(red: 0.639, green: 0.831, blue: 0.969, alpha: 1.000)

        //// mainShape Drawing
        let mainShapePath = UIBezierPath()
        mainShapePath.move(to: CGPoint(x: frame.minX + 0.81028 * frame.width, y: frame.minY + 0.39009 * frame.height))
        mainShapePath.addCurve(to: CGPoint(x: frame.minX + 0.77271 * frame.width, y: frame.minY + 0.39612 * frame.height), controlPoint1: CGPoint(x: frame.minX + 0.79766 * frame.width, y: frame.minY + 0.39009 * frame.height), controlPoint2: CGPoint(x: frame.minX + 0.78507 * frame.width, y: frame.minY + 0.39210 * frame.height))
        mainShapePath.addCurve(to: CGPoint(x: frame.minX + 0.69093 * frame.width, y: frame.minY + 0.22300 * frame.height), controlPoint1: CGPoint(x: frame.minX + 0.76339 * frame.width, y: frame.minY + 0.32133 * frame.height), controlPoint2: CGPoint(x: frame.minX + 0.73325 * frame.width, y: frame.minY + 0.25753 * frame.height))
        mainShapePath.addCurve(to: CGPoint(x: frame.minX + 0.55572 * frame.width, y: frame.minY + 0.21906 * frame.height), controlPoint1: CGPoint(x: frame.minX + 0.64862 * frame.width, y: frame.minY + 0.18847 * frame.height), controlPoint2: CGPoint(x: frame.minX + 0.59879 * frame.width, y: frame.minY + 0.18702 * frame.height))
        mainShapePath.addCurve(to: CGPoint(x: frame.minX + 0.29076 * frame.width, y: frame.minY + 0.02004 * frame.height), controlPoint1: CGPoint(x: frame.minX + 0.51674 * frame.width, y: frame.minY + 0.04650 * frame.height), controlPoint2: CGPoint(x: frame.minX + 0.39812 * frame.width, y: frame.minY + -0.04260 * frame.height))
        mainShapePath.addCurve(to: CGPoint(x: frame.minX + 0.16694 * frame.width, y: frame.minY + 0.44594 * frame.height), controlPoint1: CGPoint(x: frame.minX + 0.18340 * frame.width, y: frame.minY + 0.08269 * frame.height), controlPoint2: CGPoint(x: frame.minX + 0.12797 * frame.width, y: frame.minY + 0.27339 * frame.height))
        mainShapePath.addCurve(to: CGPoint(x: frame.minX + 0.00002 * frame.width, y: frame.minY + 0.72706 * frame.height), controlPoint1: CGPoint(x: frame.minX + 0.07290 * frame.width, y: frame.minY + 0.45072 * frame.height), controlPoint2: CGPoint(x: frame.minX + -0.00139 * frame.width, y: frame.minY + 0.57584 * frame.height))
        mainShapePath.addCurve(to: CGPoint(x: frame.minX + 0.17212 * frame.width, y: frame.minY + 1.00000 * frame.height), controlPoint1: CGPoint(x: frame.minX + 0.00143 * frame.width, y: frame.minY + 0.87829 * frame.height), controlPoint2: CGPoint(x: frame.minX + 0.07803 * frame.width, y: frame.minY + 0.99976 * frame.height))
        mainShapePath.addLine(to: CGPoint(x: frame.minX + 0.81028 * frame.width, y: frame.minY + 1.00000 * frame.height))
        mainShapePath.addCurve(to: CGPoint(x: frame.minX + 1.00000 * frame.width, y: frame.minY + 0.69504 * frame.height), controlPoint1: CGPoint(x: frame.minX + 0.91505 * frame.width, y: frame.minY + 1.00000 * frame.height), controlPoint2: CGPoint(x: frame.minX + 1.00000 * frame.width, y: frame.minY + 0.86347 * frame.height))
        mainShapePath.addCurve(to: CGPoint(x: frame.minX + 0.81028 * frame.width, y: frame.minY + 0.39009 * frame.height), controlPoint1: CGPoint(x: frame.minX + 1.00000 * frame.width, y: frame.minY + 0.52662 * frame.height), controlPoint2: CGPoint(x: frame.minX + 0.91505 * frame.width, y: frame.minY + 0.39009 * frame.height))
        mainShapePath.close()
        fillColor.setFill()
        mainShapePath.fill()
    }

}
|
Final steps:
- There are a few differences between
UIBezierPath (UIKit) methods and Path (SwiftUI) methods. So you’ll have to open your preferred text editor and do some “find/replace”.
- Remove any
fill or similar method as we don’t really care to have them inside our custom Shape.
The final code should be similar to this.
 1
 2
 3
 4
 5
 6
 7
 8
 9
10
11
12
13
14
15
16
17
18
19
20
21
22
23
24
|
import SwiftUI

struct CloudShape: Shape {

    func path(in rect: CGRect) -> Path {

        var path = Path()
        path.move(to: CGPoint(x: rect.minX + 0.81028 * rect.width, y: rect.minY + 0.39009 * rect.height))
        path.addCurve(to: CGPoint(x: rect.minX + 0.77271 * rect.width, y: rect.minY + 0.39612 * rect.height), control1: CGPoint(x: rect.minX + 0.79766 * rect.width, y: rect.minY + 0.39009 * rect.height), control2: CGPoint(x: rect.minX + 0.78507 * rect.width, y: rect.minY + 0.39210 * rect.height))
        path.addCurve(to: CGPoint(x: rect.minX + 0.69093 * rect.width, y: rect.minY + 0.22300 * rect.height), control1: CGPoint(x: rect.minX + 0.76339 * rect.width, y: rect.minY + 0.32133 * rect.height), control2: CGPoint(x: rect.minX + 0.73325 * rect.width, y: rect.minY + 0.25753 * rect.height))
        path.addCurve(to: CGPoint(x: rect.minX + 0.55572 * rect.width, y: rect.minY + 0.21906 * rect.height), control1: CGPoint(x: rect.minX + 0.64862 * rect.width, y: rect.minY + 0.18847 * rect.height), control2: CGPoint(x: rect.minX + 0.59879 * rect.width, y: rect.minY + 0.18702 * rect.height))
        path.addCurve(to: CGPoint(x: rect.minX + 0.29076 * rect.width, y: rect.minY + 0.02004 * rect.height), control1: CGPoint(x: rect.minX + 0.51674 * rect.width, y: rect.minY + 0.04650 * rect.height), control2: CGPoint(x: rect.minX + 0.39812 * rect.width, y: rect.minY + -0.04260 * rect.height))
        path.addCurve(to: CGPoint(x: rect.minX + 0.16694 * rect.width, y: rect.minY + 0.44594 * rect.height), control1: CGPoint(x: rect.minX + 0.18340 * rect.width, y: rect.minY + 0.08269 * rect.height), control2: CGPoint(x: rect.minX + 0.12797 * rect.width, y: rect.minY + 0.27339 * rect.height))
        path.addCurve(to: CGPoint(x: rect.minX + 0.00002 * rect.width, y: rect.minY + 0.72706 * rect.height), control1: CGPoint(x: rect.minX + 0.07290 * rect.width, y: rect.minY + 0.45072 * rect.height), control2: CGPoint(x: rect.minX + -0.00139 * rect.width, y: rect.minY + 0.57584 * rect.height))
        path.addCurve(to: CGPoint(x: rect.minX + 0.17212 * rect.width, y: rect.minY + 1.00000 * rect.height), control1: CGPoint(x: rect.minX + 0.00143 * rect.width, y: rect.minY + 0.87829 * rect.height), control2: CGPoint(x: rect.minX + 0.07803 * rect.width, y: rect.minY + 0.99976 * rect.height))
        path.addLine(to: CGPoint(x: rect.minX + 0.81028 * rect.width, y: rect.minY + 1.00000 * rect.height))
        path.addCurve(to: CGPoint(x: rect.minX + 1.00000 * rect.width, y: rect.minY + 0.69504 * rect.height), control1: CGPoint(x: rect.minX + 0.91505 * rect.width, y: rect.minY + 1.00000 * rect.height), control2: CGPoint(x: rect.minX + 1.00000 * rect.width, y: rect.minY + 0.86347 * rect.height))
        path.addCurve(to: CGPoint(x: rect.minX + 0.81028 * rect.width, y: rect.minY + 0.39009 * rect.height), control1: CGPoint(x: rect.minX + 1.00000 * rect.width, y: rect.minY + 0.52662 * rect.height), control2: CGPoint(x: rect.minX + 0.91505 * rect.width, y: rect.minY + 0.39009 * rect.height))
        path.closeSubpath()
        return path

    }

}
|
Final words
- Once you have done it one time, the process can be quickly duplicated for more assets.
- This method streches the asset inside the frame you’ll set in SwiftUI. It’s up to you to determine the propre size (i.e. you may keep the real width/ratio as a property).
Author
Vinzius
LastMod
23 December, 2020


